Thursday, November 14, 2013

Setting a STATIC IP ADDRESS on your Computer


Hi IT People!

I am here again to give you an idea on how you can set a static ip address to your computer located on a small LAN.

Before this, what is the main reason why we need to use Static IP Address on a LAN? or Small Office?

1.) It will easily monitor and control the distribution of IP Address.
        *Take note that the IP ADDRESS range is from 192.168.1.1 to 192.168.1.244 (Class C) only. You can say that was many and you have nothing to worry but the truth is you need to organize the distribution of your IP Address as your business gets bigger and bigger. 

       *You can have a worksheet that will serve as your IP ADDRESS INVENTORY to check what are the used and still available. (VERY HELPFUL)

Okey, Let me go now to my main topic -- Set-up Computer with a Static IP Address

Just the same procedure, we need to discuss this STEP-by-STEP

STEP 1) Click on Start Button and type "Control Panel"
STEP 2) Choose the Control Panel from your search result (Right-click on it and run as Administrator)
STEP 3) Go to Network and Sharing Center
STEP 4) On the left panel, look for "Change Adapter Setting"


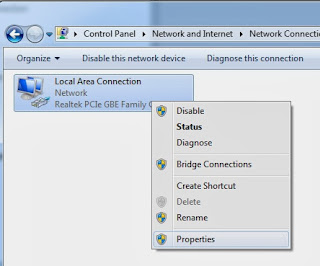
STEP 5) You must see now your "Local Area Connection" and must be visible (it means that the network cable is connected to a router or switch). Right click on it and choose Properties.


STEP 6) You must see now your "Local Area Connection Properties" and double-click on "Internet Protocol Version 4 (TCP/IPv4) DO NOT UNCHECK.


On the default setting, it was set to OBTAIN AN IP ADDRESS AUTOMATICALLY which means it is in DHCP Set-up or what we call DYNAMIC IP ADDRESSING.
STEP 7) So what we need to do is to set now the IP ADDRESS on Static. Check "Use the following IP Address" and input now your IP Address. On my example it's 192.168.1.3 and my subnet mask is 255.255.255.0 (Default value) then my gateway is 192.168.1.1 *which is my source of Internet Connection* Then, my alternate dns server is 8.8.8.8 (Google IP Address). Lastly, click OK and OK.


Test if your configured IP Address is working.

STEP 8) Try to ping your computer alone using command prompt. 
Use the command line "ping 192.168.1.3 -t" 
(Base on my example) 
and it should give you a reply.


That's it. I hope it works to you and help a little.

Thank you very much!


Did you know that? -- Windows XP

Hi IT People!


Did you know that Windows Company will not give anymore updates on Windows XP operating system starting APRIL 2014.

Meaning to say, we need to remove now all desktop computers with Windows XP OS for us to prevent on computer viruses, malwares or any harm that can break our computers. 

*Source is from google/images*

This topic was discussed during my training at Windows.

Just want to give an idea for those who are not yet updated that may be affected by this adjustment of Windows.

It is recommended to start upgrading your computers operating system to windows 7 and 8. Upgrade also the specs of your computers to meet the requirements of Win7 and Win8 OS.

*Source is from google/imgaes*


I hope that my reminder on my fellow IT Staff around there are now notified and have plans to their computers.

Thank you very much.

Basic Computer Networking - THINGS TO CONSIDER


Hi IT People!

I am here to give some things you need to consider especially if your work or you want to do something that is related to computer networking.

1.) If you are trying to ping or connect on a computer and not responding please check the Windows Firewall.
 *It sounds crazy but YES it will help you sometime. Example when you are trying to connect on a computer that host a printer and gives you an error. Simply TURN-OFF the FIREWALL (HOME or WORK and PUBLIC NETWORKS).
2.) Problem when pinging a computer to a local network connection and not responding. *Please check if your network cable is working properly and if you have a Network Tracer Device/Cable Tester it should be working from number 1 to 8.
*If network cable is working and still the computer you want to ping is not responding, please TURN-OFF the WINDOWS FIREWALL.


*got this image from google/images*

3.) Assigning IP Address to your computers to a local area network.
*Your IP Address must have the same subnet mask to ping each computer connected on the network.
*Your IP Address must not repeat! It must be one at a time deployment to your workstation.
*Your default gateway is commonly the source of your Internet Connection.

4.) If you are on DHCP setting (Dynamic IP Address) and trying to connect on a computer to your LAN, use FULL COMPUTER NAME to connect on it.

I know that this topic is too short but I am willing to discuss the topic you will email or comment as far as I know it.

Thank you very much!


How to check the specs of your desktop computer or laptop?

Hi IT People!

I am here to show you on how to get the specs of your desktop computer or laptop. You will know the Processor, Hard Disk, Memory and your Operating System.

Here are the steps:
FOR WINDOWS 7 Operating System
STEP 1) Click on your start button
STEP 2) Right-click on "Computer" and choose "PROPERTIES"

**Your screen now must show this panel"


As we can see on my computer example, My Computer specs are the following:

PROCESSOR: AMD A6-5400K APU with Radeon HD Graphics 3.60Ghz 
                 *Check website of your chosen brand to verify if your processor is still up to date or not.
                 *Radeon HD Graphics --> meaning that my processor is built-in with Graphics (You can run games without Video Card) ;)

INSTALLED MEMORY (RAM): 2.00GB (1.47GB Usable)
                *Take note that if your Operating System is Windows 7 (32bit), the highest memory that it can read is 3.99GB below.
                *Only Windows 7/8 (64bit) can read memory that has size of 4GB and up. This operating system is strongly recommended to those power users. (Ex. Rendering files, Graphic Designs, Video Editing, etc.)

SYSTEM TYPE: 32-bit Operating System 
                 *This is your Operating System bit. It can only read size of memory from 512mb to 3.99GB.

COMPUTER NAME: NiknokServer-PC
                 *Basically, what you see is what you get. It is the computer name of my computer and it can use in mapping shared drives, connecting to printers, used for ping (Network Connection) and so on.

HOW ABOUT YOUR HARD DISK?

Commonly, the Hard Disk now are just 300GB, 500GB, 1TB, 2TB and so on. All of these are using SATA port.

SATA --> Serial Advanced Technology Attachment

*In reality, this port is much better and faster than the old fashion which is IDE.

To check the size of your hard disk follow the steps below:

STEP 1) Click on your start button
STEP 2) Choose Computer 
             TIP: Shortcut key = WinKey+E
STEP 3) Look to your Drive C: and it will show below the size of your hard disk.
         *The size of your hard disk is not exactly 300GB,500GB or 1TB because it used some space for the operating system.

Always remember that the desktop computer and laptop is always upgrading therefore it is highly recommended that if you are planning to buy a computer, please make sure that it is ready for upgrade.

Example: **IMPORTANT**

Your Motherboard is ASUS --> Supports Intel Processors i-series.

This motherboard is good, meaning if I have an Intel Core i3 processor as of the moment and I am planning to upgrade on my future time, its possible.

Short History:
Intel Core i-series

1st - Intel Core i3
2nd - Intel Core i5
3rd - Intel Core i7...and still counting on upgrades..

Check the Intel website for i-series processor to verify what I am giving information.

I hope this topic is too long but it will help you a lot on choosing the best computer you need too.

I hope also that it helps you guys.

Thank you very much!


Wednesday, November 13, 2013

How to connect on a shared printer?


Hi IT People!

On our previous discussion, I teach you how to Share your printer on a Local Area Network. Now the question is “How can I connect to the shared printer?”
On this topic you will know how easily you can connect to a shared printer.
Let’s do this.

STEP 1) Check the Computer Name or IP Address of the computer where the shared printer is connected. (Easiest Way)
             
                 FOR WINDOWS XP USER

              a.) Click on the Start Button
              b.) Click All Programs
              c.) Look for "Accessories" and click Command Prompt
              d.) On your command prompt, type "ipconfig /all" 
                   (It will show all details on your network connection)

                    *Host Name ..... ..... ..... xxx xxx (is your COMPUTER NAME)
                    *IPv4 Address ... .... .... xxx.xxx.xxx.xxx (is your Local IP Address)

                 FOR WINDOWS 7 USER

             a.) Click on the Start Button
             b.) Simply type "cmd" to search bar and click on it
             c.) On your command prompt, type "ipconfig /all" 
                   (It will show all details on your network connection)

                    *Host Name ..... ..... ..... xxx xxx (is your COMPUTER NAME)
                    *IPv4 Address ... .... .... xxx.xxx.xxx.xxx (is your Local IP Address)

NOTE: IP ADDRESS has 2 kinds, the STATIC and DYNAMIC.

STATIC IP ADDRESS - you are setting an IP Address manually to the computer
DYNAMIC IP ADDRESS - automatically your computer will obtain the IP Address from your router or modem.

*On our case, STATIC IP ADDRESS is strongly recommended for easy sharing of printer.*

After getting your Computer Name/IP address we have now the details to  connect on the shared printer.

Now,go to computer that you want to share the printer with. Follow the step below:

STEP 1) On your keyboard, press WIN KEY+R (Run tab) will show.
STEP 2) Now, with your computer name or ip address on your hand let's type on the search bar this.
          Example:
                   \\172.16.1.23 -----> Using IP ADDRESS or
                   \\SUPERTECHNICAL ----> Using Computer Name

NOTE: If you run this on a Local Area Network it might need an account of administrator.

STEP 3) After you input the username and password (If needed) and you see the shared printer already after running the computer name or ip address of the printer server, right click on it and choose CONNECT.

NOTE: If your Operating System is Windows 7 (64bit), it is recommended to download first the driver of the printer that is compatible for windows 7 (64bit) on "google.com". After you install the driver for 64bit try to connect again to the printer.

STEP 4) Try to print test page or test a document to check if printer is working properly.

It must be working now and I hope it helps.

Thank you very much!

-Niknok-


How to share a printer on a local network?

Hi People!

I am here to share my knowledge to you on how to share your printer to your Local Network.

First thing is to locate your devices and printers.
 - Click your Start Button (Located on the left pane of your screen) and look for "Devices and Printers" on the right side pane showed by your start menu.


Second thing you need to do is to INSTALL (You can download your printer driver online or you can install your printer from the Original CD) your printer that you want to share.
On my example it's CANON IP2700 Series.


After you installed your printer successfully, you can now share the printer step-by-step. 

STEP 1) Right click on your installed printer and look for PRINTER PROPERTIES.

STEP 2) Click "Printer Properties" then look for "Sharing TAB" on the next form will show after you click Printer Properties.


STEP 3) Tick the box on located at the left side of "Share this printer". Share name is recommended to choose default instead of changing. (To avoid errors)
Then, Tick also the box of"Render print jobs on client computers" so in case that your printer gets some error during printing, it will render your pending print jobs on connected computers.

STEP 4) Don't forget to click APPLY every changes and then if you are finish on it, click OK.


HOW TO CHECK IF MY PRINTER IS SHARED ALREADY?

Go to you Devices and Printers, look to the printer you try to share. (On my example, it's CANON IP2700 Series) and check the information below.


NOTE: The STATE label must have an icon of 2 heads right on it that says your Printer is now shared. 
The Green Check indicate that the printer is READY.

Now, Your Printer is READY for your computer connected to your network. 

I hope it helps.

Thank you very much!

-NiknokTips-


Introduction


Hello IT People!


I am here to share some of my IT Technical Tips. This blogs will give an idea to those who are new and forgot some of their jobs before. We will start discussing some problems, issues and other concerns that we can answer here on my blog.


I hope it will help a lot and get some feedback from you guys.


Thank you very much!